After you’ve cleaned up your WordPress installation by removing the default entries you are ready to setup the last few settings. After getting through this post you’ll be all set to start creating content on your business’s brand new website.
Set Your Site Title, Tagline, and Other Settings
- Go to Settings -> General
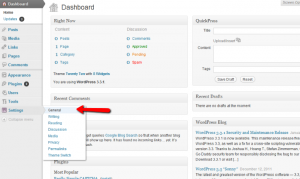
- Set Your Site Title – This is important for your users but also for Search Engine Optimization (SEO) as it will appear on most pages of your website. It will most likely be your business name.
- Following the above image setup your Tagline. This appears under your site title.
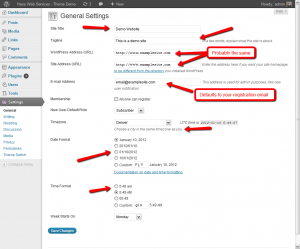
- Set the WordPress Address and Site Address URLs. For almost all business websites, these two should be your domain name and should both be the same. You probably want to set this to www.domain.com unless you have a reason not to. It will forward but most people are expecting a “www” in front.
- Your email address should already be filled out but if you want registration notifications, comment notifications or other administrative notifications to be emailed to a different address, change it here.
- Now we need to decide if you want to allow people to register for your website. This can be changed later so at this point I’d say leave it as unchecked.
- Set your Timezone by selecting a city near you. Alternatively you can select “UTC “+” or “-” the correct amount to get your current time.
- Set the date format you want displayed on posts.
- Set the time format you want to display.
- If your week starts on something different change the drop-down from “Monday” to whatever you want the week to start on. (This is used for calendar features and plugins on the website.)
Comments or No Comments – These settings most likely only matter if you will be posting blog posts or articles.
- The next question is whether you want people to be able to comment on the articles on your website. Whichever setting you pick can be changed on each post so pick the one you think will be used most.
- To set this up, go to Settings -> Discussion.
- By default the comment and pingbacks/trackbacks are turned on. (A pingback or trackback is a small message that appears when someone posts a link to your article. It provides your users links to people who are talking about what you posted.)
- If you want to either uncheck them. If you have commenting turned on you can decide in the “Other comment settings” section how much restriction you want (fill out name and email vs. being a registered and logged in user of your website – which would require registration being turned on.)
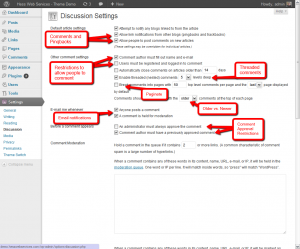
- You can also enable threading (so people can reply directly to other people’s comments) and set pagination.
- Next specify if you want the comments with the older comments at the top of the page or newer comments (default is older)
- If you want to be notified when someone posts a comment or there is a comment that needs moderation (waiting for you to approve it) you can leave those two checkboxes checked, otherwise uncheck them (I’d leave them checked at least for the beginning. Getting an email when someone comments is a great feeling.)
- There is some comment moderation options but we will skip them for now and scroll all the way down to the bottom. There is an “Avatars” section where you can pick if you want people’s picture to show with their comment, what lever of rating, and what image shows up if they don’t have one.
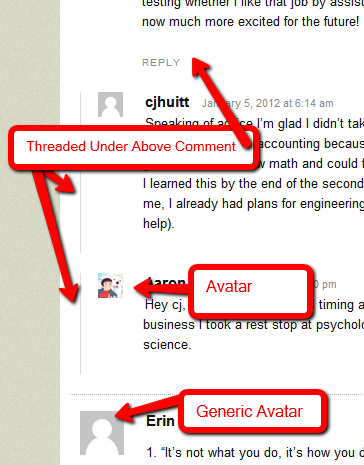
Avatar Examples - Save your changed by pressing the save button
Setup Permalinks – Permalinks are the permanent URLs to your individual article posts, as well as categories and other lists of weblog postings.
If you have your website setup on Apache (which you do if you registered through bluehost.com) you can make your website have “Pretty” permalinks. This just means your links don’t have a lot of question marks and numbers in them.
- To set this up go to Settings -> Permalinks on the admin page.
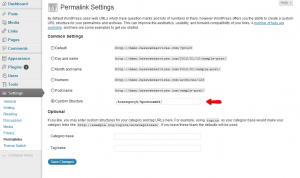
- You can see the default structure contains “?p=123” at the end – kinda ugly and not great for that SEO I mentioned earlier. So you can either pick another option if you like them or you can pick custom structure (recommended)
- If you didn’t pick another option you have lots of choices you can use in the custom structure, but I’m only going to give you 2. “/%postname%/” or “/%category%/%postname%/”If you pick the one with category in front it will put the category as well as the post name (You can see this post has “/how-to/” in front of the post name. Either option is fine and I prefer the categories in the post name as I believe it is better for SEO. (Copy the contents of the quotes and DON’T include the quotes but DO include the slashes and the percents.)
Well I think that’s pretty much it. You’ll have some additional setup with plugins and themes but at this point your website is up and running and WordPress is pretty much good to go. Have Fun!

Leave a Reply to Errol Khong Cancel reply